Create an apple style menu and improve it via jQuery
Since I wrote my last tutorial on how to create a CSS only multilevel dropdown menu I got a lot of visitors who wanted to know how I created the main navigation of kriesi.at. (a so called kwicks menu) The interest in extraordinary menus seems to be high nowadays, so today I will teach you how this is done.
Since the Apple-flavored Leopard-text-indent style is currently one of my favorite menu styles, we will start from scratch and build such a menu in Photoshop, then create the needed HTML and CSS and last but not least improve it via jQuery.
This is what we are going to build (don't forget to hover over the menu)
Since the Tutorial is rather long and comprehensive here is a short overview of the upcoming tasks:
- Part 1: Conceptional Work
- Part 2: Photoshop
- Part 3: HTML and CSS
- Part 4: jQuery
- Part 5: Voluntary Exercise – Rounded Corners
- Part 6: Holy crap, too much work, I just want to download this and leave
Part 1: Conceptional work
First of all you should do some conceptional work since
- you need to know the height of your menu items
- you need to know the width of your menu items, both in normal and hover state.
- you need to know how many items you want
After creating a single JPG file out of photoshop we will use a fairly common technique called CSS Sprites to display the menu. By creating a navigation using an image sprite, you can have a complete navigation with rollovers by only using one image.
Never heard of that technique before? Here is a pretty good explanation if you want to know it in detail
My menu will contain 4 menu items, each 40px high, 125px width in normal state and 200px on hover state.
So I will create a new .psd file with the dimension of 800px x 80px. The width is the result of the hover state multiplied with the number of menu items (200 x 4), the height is two times the menu height: we will display the hover state of the menu item directly below the normal state.
Part 2: Photoshop
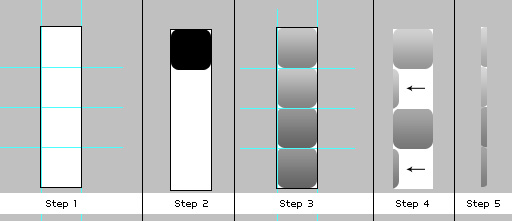
After creation of your new photoshop file you should add some layer guides. This really helps aligning the different menu items pixel perfect:
As you can see i divided the canvas with a single horizontal line at the 40px mark, and made a guide every 200px to mark the end of each menu item. I then made a guide for the 125px normal state as well. These Guides are not needed but very helpful ;)
Now create a new layer, select black (this is important for later) as foreground color and draw a rectangle which fills the upper half of your file. Then double click the layer in the Layers palette to open the layer styles, select Gradient and apply a gradient with the foreground color #959595 and #d0d0d0 as your background color. The result should look similar to the the picture above. Opacity should be 100%.
Now we are adding the inset text: Select the Type tool and set the font to Myriad Pro Regular and #444444 as color. Open the layer styles for this layer and select the Drop Shadow option, then apply the following settings:
- Blend Mode: Normal
- Color: #FFFFFF (white)
- Opacity: 50%
- Use global light: off
- Angle:90°
- Distance:1
- Spread: 0
- Size:0

To center the text pixel perfect horizontally as well as vertically select the marquee tool and draw a rectangle. Thanks to the layer guides the rectangle will snap into position and have the exact same height and width for each item. Then select the move tool and hit the align buttons for align vertically and horizontally. Repeat this for each menu item.
Next we will add the icons for the hover effect. I used the famous "Bright" Icon set by Min Tran. These icons should be applied between the 125px and 200px guide. After doing that create a new folder in the layer palette and put all layers created until now into this folder.
Now duplicate this folder. Select it with the Move tool and drag it 40pixel down. The horizontal guide should help you putting it into the right place. After doing that go to the layer style palette for this layer and set the opacity of the gradient to 80%. Last thing to do is to change the color of the Text to #FFFFFF and edit the Text layer styles:
Set the drop shadow to -90° and the color to #000000. The image above shows you how your image should look now.
To add the borders between the menu points select the line drawing tool and set the foreground color to #969696. Select the pixel mode and remove the checkmark from anti alias. This is needed to draw a exact line of 1px without any blur. After drawing this line from top to bottom of the image go to the layer style palette again and add a border of 1px, color: #b8b8b8, position outside and set the Blend Mode to Lighten.
After doing that align the borders directly beside the layer guides as seen in the picture.
What we got now should look something like this:
Now export this image as kwicks_sprite.jpg. Don't slice anything, just export the picture ;)
Part 3: HTML and CSS
The HTML part is rather easy: all we need is an unordered list with classname kwicks. Each list item must have an id which is composed of kwick + the number of the item.
<ul class="kwicks">
<li id="kwick1"><a href="#">Home</a></li>
<li id="kwick2"><a href="#">Contact</a></li>
<li id="kwick3"><a href="#">Downloads</a></li>
<li id="kwick4"><a href="#">Search</a></li>
</ul>
Thats it for the HTML part, now comes the CSS:
.kwicks {
list-style-type: none;
list-style-position:outside;
position: relative;
margin: 0;
padding: 0;
}
This is needed to remove margins and paddings from the menu, as well as the list bullets.
.kwicks li{
display: block;
overflow: hidden;
padding: 0;
cursor: pointer;
float: left;
 width: 125px;
 height: 40px;
 margin-right: 0px;
 background-image:url(kwicks_sprite.jpg);
 background-repeat:no-repeat;
}
Major styling done for the list item here. Height and width are set and our image is set as background for each list item. Since we don't want to display the normal list Text we set the text indent for all links to:-9999px:
.kwicks a{
display:block;
height:40px;
text-indent:-9999px;
outline:none;
}
What we got now looks pretty good: HTML- Step 1
Now we want to display the appropriate menu point so we have to change the offset of the background image with css for each list item:
#kwick1 {
background-position:0px 0px;
}
#kwick2 {
background-position:-200px 0px;
}
#kwick3 {
background-position:-400px 0px;
}
#kwick4 {
background-position:-600px 0px;
}
And voila, looks like a real menu: HTML- Step2
Next thing we do is adding the roll over state:
#kwick1.active, #kwick1:hover {
background-position: 0 bottom;
}
#kwick2.active, #kwick2:hover{
background-position: -200px bottom;
}
#kwick3.active, #kwick3:hover {
background-position: -400px bottom;
}
#kwick4.active, #kwick4:hover {
background-position: -600px bottom;
}
The pseudo class ":hover" is added to the list item and not to the <a> tag. Since Internet Explorer 6 can only work with this pseudo class when applied to an <a> tag we define an extra active class which accomplishes the same. This class will be automatically added by the jQuery script on hovering. You might ask yourself why I didn't style the <a> tag with the background image to circumvent this problem. I do this because of the round corners which I will apply later on. I could have done it anyway with a little bit of extra HTML markup but I want to keep the HTML as clean as possible. It's truly only a matter of preference. If you intend to create a menu without round corners you can apply the background images, as well as the offsets directly to the <a> tag.
So if you are using a browser other than IE6 you can see a basic CSS sprite menu with different hover states now: HTML- Step3
Thats it for the CSS part, we will add the round corners add the end of the tutorial since its something not everyone will be interessted in and demands a little bit of extra work.
Part 4: jQuery
To add the sliding effect we need to add the wonderful kwicks plugin for jQuery created by Jeremy Martin. Of course you need to import the jQuery framework as well.
Your HTML head should look something like this:
<link rel="stylesheet" href="style.css" type="text/css" media="screen" /> <script type='text/javascript' src='jquery-1.2.6.min.js'></script> <script type='text/javascript' src='kwicks.js'></script> <script type='text/javascript' src='custom.js'></script>
Be careful with the order of the items. Due to the fact that the kwicks plugin relies on some of the CSS classes we defined you must include the CSS before the kwicks.js file. The custom.js file is a blank Javascript file which you should create, we will now add the code of execution to this file:
function my_kwicks(){
$('.kwicks').kwicks({
duration: 300,
max: 200,
spacing: 0
});
}
$(document).ready(function(){
my_kwicks();
});
The code is rather easy to understand: the function my_kwicks calls the execution of the plugin with several parameters:
- duration of the sliding effect in milliseconds
- max width of each kwicks item in pixel
- spacing between the items in pixel
You can define many more parameters, a comprehensive list can be found at the plugin page at the documentation tab.
The ready function executes the code as soon as the site (in particular the DOM) is loaded. Thats it for the jQuery magic as well: here we got the working example
Congratulations, you are done now ;)
Part 5: Voluntary Exercise – Rounded corners
The rounded corners can be added with different techniques. Since a major part of this tutorial is dedicated to the task of CSS Images sprites we will extend this a little bit by creating a rounded corner sprite. One image for the left and right corners, along with the hover state. The easiest way creating an image sprite like this is aligning the different sprites below each other. Since we need 4 different sprites we will create an image of 160px height and a width of your choice. The width doesn't matter since we will crop the image afterwards. ( I will use 40px width for now)
- First you should add layer guides again for pixel perfect alignment.
- Select black as your foreground color and draw a rounded rectangle (8px radius, anti alias:on).
- Copy this rectangle 4 times and apply the same layer style of the menu background, which we created in Part 2: Photoshop. The 2 bottom rectangles are for the hover state of the menu, so they need to have the same layer style as the hover state of the menu items (opacity:80%)
- Now move rectangle 2 and 4 out of the canvas until you only see the round corners.
- Crop the image so that only the round corners can be seen.
Export the Image as end.jpg and add the following styles to your CSS file:
#kwick1 a{
background-image:url(end.jpg);
background-repeat:no-repeat;
background-position: left 0px;
}
#kwick1 a:hover{
background-position: left -80px;
}
#kwick4 a{
background-image:url(end.jpg);
background-repeat:no-repeat;
background-position: right -40px;
}
#kwick4 a:hover{
background-position: right -120px;
}
This adds the corner sprite to the first and fourth menu item and overalps the background for the list item.
Your are done now: here is the final menu
Part 6: Holy crap, too much work, I just want to download this and leave
Well, in case you couldn't get this to work or are to lazy to create the files: here is a Zip- Package with all items: psd files, html, css and javascript:
Hope you liked the tutorial and learned something, have a nice day ;)
Responses to “Create an apple style menu and improve it via jQuery”
Trackbacks
- КÑширование в WordPress (1/3)
- Creating an Apple Style Menu with Animation | My Other Beans : Claude Betancourt's Blog
- Neat Apple Menu with jquery - Graphic Design Forum and Web Design Forum
- www.marwebdesign.net » Blog Archive » Kwicks for jQuery
- Weekly linkage madness - elisa.nobe.blog
- Websites you Shouldn´t have missed in JULY 2008
- Threadless t-shirt site and nice menu « External Memory
- kwicks Slidemenu mit jQuery » » pixey.de
- Un joli menu en css facon apple style | Marc Decerle
- Nova’s Blog » Blog Archiv » JQuery Tutorials für Einsteiger
- S A N D E E P [ I N D I A N I C ] » Blog Archive » Websites you Shouldn´t have missed in JULY 2008
- Websites you Shouldn´t have missed in JULY 2008 | POLPDESIGN
- Menu con i CSS: ispirazioni da Apple | Edit - Il blog di HTML.it
- 75 (Really) Useful JavaScript Techniques | Developer's Toolbox | Smashing Magazine
- 75 (Really) Useful JavaScript Techniques | The Creative Children
- 75 (Really) Useful JavaScript Techniques | aboutCREATION
- 75 (Really) Useful JavaScript Techniques | POLPDESIGN
- 75 (Really) Useful JavaScript Techniques | The Human Network (HCI IDC Alumni Blog)
- 75 Useful JavaScript Techniques | download
- 300+ Jquery, CSS, MooTools and JS navigation menus | PaulSpoerry.com
- links for 2008-09-15 | SmileHappy
- 75 técnicas (realmente) útiles con JavaScript - Carrero Bitácora de los Hermanos Carrero, David Carrero Fernández-Baillo y Jaime Carrero Fernández-Baillo.
- 75 (Really) Useful JavaScript Techniques | Neurosoftware web dev
- Exotov bóÓlog » Blog Archive » Best of jQuery - tutoriály na výrobu efektného navigaÄného menu
- 75 (Really) Useful JavaScript Techniques | rowebdesign
- 75 (Really) Useful JavaScript Techniques | rafdesign
- 75 useful Javascript Techniques | rafdesign
- Design Feeds » Blog Archive » 75 (Really) Useful JavaScript Techniques
- 70 técnicas JavaScript profesionales + tutoriales avanzados. | AlainAlemany
- Navigation Effects Using JavaScript - Hidden Pixels
- 75 (Really) Useful JavaScript Techniques « Where LOVE begins
- pligg.com
- webdesignlab » Blog Archive » Apple風ナビゲーションãƒãƒ¥ãƒ¼ãƒˆãƒªã‚¢ãƒ«
- Ajax Apple Menü ve Menumatic | Tasarim Rehberi
- 300+ Jquery, CSS, MooTools and JS navigation menus | 1stwebdesigner
- [CODE]类似flashçš„èœå• | Mukon.s way | 我的éžå‡¡ç”Ÿæ¶¯ï¼
- 75 (Really) Useful JavaScript Techniques | Evolution : weblog
- Le menu css du Lundi | taggle.org
- Fondos de Pantalla » Blog Archive » Menú estilo Apple y mejorado con JQuery
- Menús web al estilo Apple mejorados con JQuery — maclatino.com
- Menús web al estilo Apple mejorados con JQuery « Mac Digest
- Bitte um deutliche Kritik sowie Vorschläge zu einem Problem - Seite 2 - XHTMLforum
- 13 Excellent Tutorials On Creating jQuery Navigation Menu | DeveloperFox
- 13 Excellent Tutorials On Creating jQuery Navigation Menu | Pedram Development
- jQuery menu/ navigation tutorials | Web Design Blog x2interactive. Ένα blog για το Internet και το Web Design
- Package of the most cool and useful websites of this month | Design it
- Menú estilo Apple y mejorado con JQuery
- WebAir Blog » Blog Archive » 17 “Must see” Menu in jQuery
- 25 jQuery Tutorials for Improved Navigation Menus
- Creando un Menu estilo Mac con ayuda de JQuery — CalinSoft
- Geek Week - CSS, jQuery,Wordpress, PHP, XHTML, Web Design, web 2.0 | JasonCypret.com
- Enlaces del 06-02-09 | evelio.info
- Tuttum 75 (gerçekten) kullanışlı javascript tekniği | javascript, buton, java script, javascript kodu, javascript menu, jquery, prototype.js, scriptaculous, mootols, javascript kütüphanesi, javascript kodları, javascript kütüphaneleri, javascrip
- 40+ Excellent jQuery Tutorials | instantShift
- 100 Best JavaScript Resources | Spoonfed Design
- Creating Apple Style Menu With Kwicks Effect - WebStockBox
- Web Pickz » Blog Archive » 75 Useful JavaScript Techniques
- NI-Limits Blog » Blog Archive » More Cool Tutorials
- Creating an Apple Style Menu with Animation
- Lista de 12 dicas de JQuery | Blog Tecnologia e Educação
- 75 (Really) Useful JavaScript Techniques | forcto.com
- Muazzam Jquery Çalışmaları ! - Miraç Baran Satıç’ın Günlük Blogu
- 40 Exceptional jQuery Interface Techniques and Tutorials
- 40 Exceptional jQuery Interface Techniques and Tutorials | e-szablony.eu
- 20+ Excellent Awesome Javascript And CSS Menus | PCandWEB
- 15 jQuery Menu Dropdown, iPod Drilldown, and Flyout styles » JOSTUDIO
- Useful JavaScript Techniques « the gypsy
- Top 10 Jquery Examples with Live Demos | MyPHPDunia
- How to replicate Apple.com, one piece at a time. | blarnee.com
- http://www.scriptremix.com/
- jQueryを使ã£ã¦ã‚¢ãƒƒãƒ—ル風ã®ãƒ¡ãƒ‹ãƒ¥ãƒ¼ã‚’作る方法 | メモ ãƒã‚¤ãƒ³ãƒ€ãƒ¼
- 49 praktycznych tutoriali jQuery, które ożywią Twoją stronę - Webdesigner blog
- 70 técnicas JavaScript profesionales + tutoriales avanzados. | Webizzima
- 300+ Jquery, CSS, MooTools and JS navigation menus « Dogfeeds——IT Telescope
- 25 jQuery Tutorials for Improved Navigation Menus | brainstorming magazine | use the brain to get ideas
- Oxide | WPLuxe
- Outstanding jQuery Navigation Menu Tutorials - Webexpedition18
- 9 ตัวà¸à¸¢à¹ˆà¸²à¸‡à¸à¸²à¸£à¹ƒà¸Šà¹‰à¸‡à¸²à¸™ jquery | Select2web.com
- Menu estilo Apple com jQuery | Links Web
- 75 (Really) Useful JavaScript Techniques « Ramesh
- Webアニメーション Ajaxã¨Flash | Druqks
- Jquery Navigation Menu | SNilesh.com
- 100个最佳的JavaScript资æº(61~80) - Hobo
- jquery flash??????7? | ????&??????
- 25+ jQuery Tutorials Roundup | ExtraTuts
- 25? jQuery ???? « SonicHTML – ??? HTML+CSS ??
- Amazing Multi Style Menu w/ jQuery and CSS | Free Share Everything
- | jQuery Wisdom
- Amazing Multi Style Menu w/ jQuery and CSS | Psychokiller
- ????????????????????? - javascript library @inforz
- BlogoTips » 10 Navigatin menus with JQuery
- 13 Menu Design Tutorial using jQuery
- bi ileti » Site Ar?ivi » 10 adet navigasyon menü yap?m?.
- 10 incredible JQuery navigation menus « BeginnerPC : Tips , Tricks & Tutorials
- 20 Apple-inspired Tutorials for Practice Web Designers
- jQuery Tutorial – Create an apple style menu and improve it via jQuery | jQuery Wisdom
- 40 Exceptional jQuery Interface Techniques and Tutorials | 9Tricks.Com - Tips - Tricks - Tutorials
- 75 (Really) Useful JavaScript Techniques | 9Tricks.Com - Tips - Tricks - Tutorials
- 78 jQuery Scenarios to Fall in Love | ProgrammerFish - Everything that's programmed!
- Tutoriais e demos de menus em JQuery | idealMind
- 10 Tutoriais e demos de menus em JQuery | idealMind
- 10 incredible JQuery navigation menus | meshdairy
- Jquery for Web Design: Navigation | Chicago Web Design
- Le vrac de la fin de semaine | Robin-d
- WorldConnect weblog » seo&web design links
- Bubblicious » Blog Archive » 15 jQuery Navigation Solutions And Tutorials
- 50 Cool CSS Menus, Free Source Codes + Tutorials | Theme Center
- 42 jQuery Navigation based Techniques | Codrops
- Jquery superB navigasyon menüleri | Faydal?Web | Internetin Faydal? Yüzü
- Yepyeni jquery navigasyon menü | Blog GizliKale Güncel Linkler
- 26 jQuery Plugins for Superb Navigation | WebDesignFan.com
- Ibidem Network Files » Blog Archive » recopilación de menus
- JQuery Menü Örnekleri, JQuery Navigasyon Menü | Efeli.Net | teknoloji , güncel haberler , blog , google , webmaster
- +20 excellent jquery menus tutorials | ExtraTuts
- 10 Harika jQuery Navigasyon Menü - sosyopat blog
- 20 menus para jQuery - Desarrollo WEB
- 13 bài h??ng d?n t?o hi?u ?ng cho menu b?ng jquery
- 12 CSS and Javascript Menu’s you can use today | Graphics Overload
- Create an Apple Style Menu and Improve it via jQuery « Jbloo
- 13 Excellent Tutorials On Creating jQuery Navigation Menu | DevWebPro
- 10 jQuery Tutorials For Web development « Er.Krushna Chandra Muni :: Professional Web Developer | Website Design Orissa | Website Design Bhubaneswar | Website Design India | Website Design New Zealand | Website Design Auckland
- ??????? jquery ???????, jquery ???????????, jquery ????????? ????, jquery ??????????? ?????????
- D3prodesigns » Blog Archive » New layout
- Apple Style Menu
- Professional web designers and web 2.0 experts » Blog Archive » Top 40 Jquery for Web Design: Navigation
- 15 Incredible Apple Webdesign Style Coding Tutorials | Afif Fattouh - Web Specialist
- 75 (Really) Useful JavaScript Techniques « PSD to HTML , Slicing PSD to HTML
- 40 Exceptional jQuery Interface Techniques and Tutorials « PSD to HTML , Slicing PSD to HTML
- 15 Most Interesting jQuery Tutorials « PSD to HTML , Slicing PSD to HTML
- jQuery Navigation Menus: A look at 13 Tutorials « Web Design
- 15 amazing jquery navigation tutorials | Presidia Creative
- eagrapho » 35 Awesome jQuery Navigation Enhancing Plugin Tutorials
- 10???jQuery?? | ???
- 15 Amazing jQuery Navigation Tutorials | qface & sowmo sky
- ..still try and try.. » Blog Archive » 10 Beautiful jQuery Menus
- 10 Exceptional animated navigation menu around the web. | CSS | cssjunction
- 10???jQuery?? | ??|??
- 15 Most Interesting jQuery Tutorials « Nulls
- 45 jQuery Navigation Plugins and Tutorials - Noupe
- 45 jQuery Navigation Plugins and Tutorials | iDESIGN
- 45 jQuery Navigation Plugins and Tutorials | Afif Fattouh - Web Specialist
- 45 jQuery Navigation Plugins and Tutorials | Google Reader | ????? ?????
- 45 jQuery Navigation Plugins and Tutorials
- 45 jQuery Navigation Plugins and Tutorials » IMvsMI blog
- 45 jQuery Navigation Plugins and Tutorials | SeanBurdick
- 45 jQuery Navigation Plugins and Tutorials - Interactive Middle East
- 45? jQuery???????? « SonicHTML – ??? HTML+CSS ??
- Top 15 Jquery CSS Animated Navigation Tutorials – Designzzz
- 75 (Really) Useful JavaScript Techniques » ??
- 15?Apple???????? | ???
- ????
- ???? » 10???jQuery?? -- ???php??,????,????,SEO,???,????,????,????,????,????,?????web??????
- 40??jquery?? | QK31
- 45?jQuery???????? _ ????_??????????????????????
- 25 Excellent jQuery Tutorials for Navigation Menu « AcrisDesign – Web Design Resources and Inspiration
- Top 10 Jquery Examples with Live Demos
- PHP-help » Excellent jQuery Tutorials
- PHP-help » Excellent Collection Of jQuery Tutorials
Wow, amazing.
I really like this blog, thanks!
Small note regarding the borders – you can also use the selection tool (M in photoshop) to "draw" a 1px empty container on a blank layer, and then use the paint bucket tool (G) to fill it in with the color you like. This way, you can also create a very controlled environment for the border (e.g. using a soft brush tool to add a "burst" of brightness that doesn't extend across the entire height).
Good jQuery too btw.
Hey nice tutorial.
Btw the menu of your site has some problems on my config (firefox 2 on linux): the template image of little particles going up is shown over the logo, and also duplicated where it should be. Additionaly, when i mousehover over another item (i mean, switch which button i hover), i have the shape of the particles image (ie a rectangle) that blink once before showing it right.
But I realloy like your technique, it looks great and it's fully accessible and unobstrusive. Great job :)
Hey Romain, thanks for the information, guess its time for me to get a linux installation as well for testing purpose ;D
Nice tutorial. Great work.
This is an interesting technique – I've done some similar work, but this is much reduced from a code standpoint, and certainly from an effort standpoint.
Wow, really amazing, i love jQuery mach more!
Fantastic!
What a nice tutorial. Thanks for taking the time to teach us your amazing skills!
Thanks for sharing the tutorial. Can u write a tutorial of how to create the header like yours. i dont think its flash. But how did u make it?
Spectacular tutorial! you wrote it up pretty nicely, it was easy to follow along to.
It's great
Very nice article! Thanks
Great tutorial! :D
Can you explain the "particles" in your header?
I don't know, but, maybe you are using JQuery Flash, right?
Thanks again por this tutorial, really good; and thanks for your answer about the particles.
Hey ZoiX, you are right I use this plugin to place a small swf file on top of the header. To create particles like that you should search the web for a tutorial, I can't really explain how I did it, it kind of happened during an experiment =)
Excellent tutorial, can't wait to try it out on a site of my own. Thanks!
Beautiful.
How much would you charge to make me one for my website.
Looks very nice, JQuery is really a powerful tools.
Wow thanks this is a great tutorial <3
Can you make this menu into a multi level menu?
2nd The Motion For The Multilevel lol
Hi Kriesi, thanks for this excellent tutorial.
but i need some help for finalize my menu:
http://www.visiocore.com/kwicks/kwicks_final.html
I do how in tuto but it's doesn't work correctly, i have a big bug :)
Can u look it please and tell me what is wrong in the css?
Thanks in advance.
See ya
really fantastic. Thanks for your little tutorial… :)
Amazing !
I have downloaded your zip file but i don't know how to use it :( I'm a beginner.. Can you tell me how can i use it ?
Thanks You !
Thanks, I tried
to add colour – it looks cool
but now it no longer looks MAC-ish.
This tutorial is nice way
to ease into learning
that very sexy jQuery scripting stuff.
again thanks _(~~)_
Nice one :)
Thanks for sharing this
Thansk very good menu
amazing menu! thnx :)
This is awesome, thanks.
I tried using your menu and in the same page the pathfusion multibox which uses mootools and it doesn't slide. It just keeps the rollover effect.
Here is the code:
If I comment or delete the last two lines, your menu works flawlessly…
Any help would be appreciated…thank man…GOOD JOB!
(you got my email)
oops…the code didnt appear here it goes again:
(script type='text/javascript' src='jquery-1.2.6.min.js'></script)
replaced < with ( to make it appear in comments…lets see if it works.
Hello!
Very nice Tutorial! Thanks!
I was wondering if I could combine it with the jQuery Dropdown Menu.
I just couldn't figure it out!
Greedings.
Thank you … this tutorial has me very helped.
Tested on Mandriva 2008.0 with Firefox 2.0.0.6 and Epiphany browser.
Without any issues or failure. :)
Very nice post! Thanks
This is an excellent tutorial which you have posted here, thanks for this and for your effort.
Thanks,
Vivek
[vivek@developersnippets.com]
Thank you so much
really nice
Well, creativity always amazes me…. and this one surely does.
Many thanks.
THIS ABSOLUTELY AWESOME!!!!!!!!
Best menu Tutorila I've come across so far.
Thank You
Very Nice!
Can You Tell Me The ".DS_Store" Is Do What?
(Sorry,My English….)
Kriesi thanks for this tutorial, I have implemented this menu on my ClickPlay Games site.
I can't get it to work in IE7… is there something I need.
awesome Work!
Great tutorial !
Just wondering how I could make a menu option -when active/clicked- stay "open" so that I could have submenu items.
So in other words – now you hover over a item and you see the whole menu item – when I click a certain menu item I want it to stay like that ..
Already have been trying it in the custom.js file but my jquery knowlegde isn't that good yet..
Hope someone can help me here !
Thnx
Amazed with your tuts. You're true designer. Keep it up lol
great!
I'm in a problem … how to implement this into joomla?
its working everyting except – active link
Absolutely Amazing!
hi Great Tutorial!
Can you integrate it with a dropdown menu? i cant figure it out! :(
hey buzzlair …the header is made of JQUERY not flash
wow nice tutorial, but i want to ask, how we give different style on the current page like on your site? we can see that the current page on your site has different image (the text is glowing).
thanks
Grat, thanks. Also a little Apple Fanboy like me ;)
Well, have a look at http://www.apfelkuh.de/blog.. and main domain is getting even worse ;) (explanation: Apfelkuh ger. : Apfel = Apple, Kuh = Cow, so its Applecow in english…)
Well, but back to topic:
nice Work, gonna use it, iLike.
Heya. The very last example (the one with rounded corners) is broken in Safari. The others work just fine. Nice writeup!
please tell me how I add the option to show the current link in the menu.It mean if User i home page I need to change the home page link style(highlight).like http://www.kriesi.at/archives/apple-menu-improved-with-jquery this site
Great tutorial and great job. Thank you!
How can I highlighting current page link?Can you help me?
Thanks
Thanks for your tutorials dude ! keep going :)
Wonderful, working in firefox and ie6+. Thanks much.
Good design and functionality…
thanks..
Hey great tutorial just working my way through it now. I notice it doesnt work with chrome that well. on any other browser it is superb!
many thanks
Nice Menu, really nice ;)
thanks
Man this menu is beautiful. Is there any way for it to drop down? I'm thirding the motion that's out there already.. I'm definitely going to use it on my site Capoeira Science. Im ready to reformat the linking structure I like this menu so much but if it could drop down… oh if only.
I have tried implementing this and the slide out feature isn't working for some reason. Anyone have any ideas why this might be?
好漂亮
having different widths, how is it possible to assign different values to the "max" parameter in the my_kwicks() function? Or is there another way to do that?
TNX
Dude… Don't have words .. its simply amazing…
Killer tutorial, very nicely put together. Love your work, thanks.
You.are.awesome.
I just implemented this on my new site design and it looks great. I've really been trying to get into jquery but haven't been able. This article was really easy to follow and super useful! Thanks a lot!
Nice, Thanks.
Great tutorial !! Really helped me out!
Hi,
superb tut….
Is there any way, or simple, to make the menu captions textual rather than images? Lot's of work for a multi-lingual website.
Thanks again.
Nice tutorial! very well explained. However in my opinion Myriad Pro Semibold (with crisp setting) matches better than Myriad pro Regular.
This is a great interactive menu! The use of sprites definitely improves performance. Good job!
this is awsome mann,thanx
Love the script dude. I've integrated it into my website.
Big Index – Australian Business Directory
amazing menu. great job!!
nice work,keep it commin bro
Awesome tutorial.
Now, how would you do the same thing for wordpress? That would be a good tutorial.
Thanks for this great tutorial! it's really helpfull!
I'm having a hard time understanding how to modify this for my own site. The size in 780px wide, and one of the buttons is much larger than the other 4. Can you please help?
A*M*A*Z*I*N*G
I'll teach this effect to my wed design students.
Thanks a lot.
A*M*A*Z*I*N*G
I'll teach this effect to my web design students.
Thanks a lot.
this is gooooood.tnx
I've used it for client's cool menu – thank you so much!!!
Thanks, Nice tutorial, useful for many people
Awesome menu! I need to have 5 items on my menu but my photoshop knowledge isn't so good. I've tried to follow your instructions but no luck..can anyone help me?
Thanks
I love JQUERY and use it on most of the websites..
Thanks loved it, will use it for my blog as well. :-)
Very nice indeed, will be using this technique for our site soon. Thanks a lot.
Really cool tutorial, thanks.
you can add a selected item css
it's very good nice,thank you!!!
Excellent menu. I've liked the technique since I saw it in your own nav.
thank u very much…
Very helpful! I like it!
no doubt its really amazing tutorial
Thanks all
nice trick…love it
Hey nice menu =) luks gr8
but can you tell me that how can I make a dropdown in it?
like on mouse hover a drop down menu is shown under the link and when mouse is out the menu is gone…..
can u do that please ?
Will this work in IE8 or 7 ? i can not get it to work
Hmm i've followed the tutorial step by step and using this in plain html page it worked flawlessly (mind few errors with picture location address) but doing this in asp.net it wont perform any movement animation. It does change the pic on roll over but without the sliding movement, it just swaps it….any idea anyone
Wow, thank you … this has me very helped.
If you want to use the current or active state you have to use an .active class in your css file, or use the sticky event in your java file. Look at http://www.jeremymartin.name/projects.php?project=kwicks for documentation.
Stephan is this refering to my question? I dont really get what he means by "Lastly, note that the "active" (expanded/expanding) kwick is given an extra class of "active". This allows you to specify extra style rules on the active kwick."
thanks in advance
What’s so great about this menu or jQuery in general? To me this is like going backwards in Web Development.
1. How can this menu be updated from a CENTRAL POINT without having to re-paste the same navigational “li” and “ul” elements on each successive html page? And I don’t want to hear any re-posts about server-side includes either, as most hosting companies worth their salt don’t allow SSI for security reasons. Are we then forced to turn every single page into a dynamic (PHP, JSP, .NET, etc.) page just to be able to use and include statement to update a simple jQuery menu from a central file? Talk about a pain.
2. When JavaScript is OFF or gets turned OFF then jQuery goes buh bye. How is it good that people want to use MORE JavaScript? For years developers and users have been complaining about too much JavaScript being used, lack on scripting consistency between browser engines, security concerns… and here we are PILING it all back on (in jQuery heaps) all over again. Yeah, let’s go backward in web development!
3. jQuery is just an attempt to mimic Flash, so why not just use Flash? Flash doesn’t die when the JavaScript lights go OFF. And Flash can be updated from many central points like text files, databases, or XML files.
From an updating standpoint and from a programming standpoint… I’m just not seeing much to the point of MORE JavaScript (jQuery) in a web world were there is already too much janked JavaScript and where people get upset and kill JavaScript because their browser engine messes it up, or where a security program flips the JavaScript OFF switch, all killing jQuery instantly. jQuery is just more JavaScript… so why are we going backwards in web development with jQuery?
thx collect it to
ajax.wespai.com
I found the issue with IE 8 not working. The Javascript breaks on line 27 because "container $(this);" doesn't have var in front of it.
line 27 should be:
var container $(this);
I hope this helps everyone.
EmereeFep
ypbg
very nice website
Hi, this excellent.
I like one of your templates, but would like some slight modifications because I want to add the ecommerce plugin.
Are you available to help with this, please?
Cheers, John
Hey, spent hours browsing the net and finally stopped here. Great Work!!
Great job! I'll use it on my site!! Thanx
Just great ,just what i want.
nice tutorial. thanks a lot
You guys are doing a very generous job by providing these tutorials to us … Tnx a lot
Thank you for this tutorial, i got the idea of sliding the menu bar items, but i didn't even use the photo-shop before, i tried to edit your PSD file to change the textbut it wasn't work out for me.
I know my question is not related to this tutorial, but can you show me how to edit the text, i think that your PSD file is corrupted.
I've been looking for this exact information on this subject for a while.
Very nice menu, I implemented it on my online store. The only issue is that the Lightbox for showing larger images is not working anymore. Any ideas?
http://www.puimic.ro/produse/carucioare/firkon-verano.htm
Thanks.
Solved. The solution is to use the noConflict() method and replace the custom.js file content with the following:
var $j = jQuery.noConflict();
function my_kwicks(){
$j('.kwicks').kwicks({
duration: 300,
max: 200,
spacing: 0
});
}
$j(document).ready(function(){
my_kwicks();
});
Thanks again and good luck!
???????????google???????5555
very nice article.. thank you!
Very nice and useful tutorials for web designers,
Thanks for posting.
Very nice tut dud . good job
Sehr schönes Tutorial! Sehr gute Arbeit.
Gruß aus DE
"Part 6: Holy crap, too much work, I just want to download this and leave"
LMAO! Thanks a bunch. This was perfect for me.
This is awesome!! i did the tutorial, and i modified the psd, css and java to fit the size i wanted. At first it worked perfectly in both FF and IE, but now all of a sudden when i tried running it a couple of hours later it is not working anymore? not sure if i did something i shouldn't have in the mean time, but do you have any suggestions?
once again, great tutorial :)
I came across common question on jquer kwick apple style, that it does not work properly in firefox. The script is all fine,,, make sure you have referenced to javascript files correctly. On local machine, it looks like "js\custom.js"… change such instances to "js/custom.js"
Hi.
I'm wondering can you help me making this menu expand vertical insted of horizontal? I know I have to do something in the kwics.js file but I'm not a much of a programer so please, can you help me with this task?
PS. Sorry for my english.